

Agent memory
Review
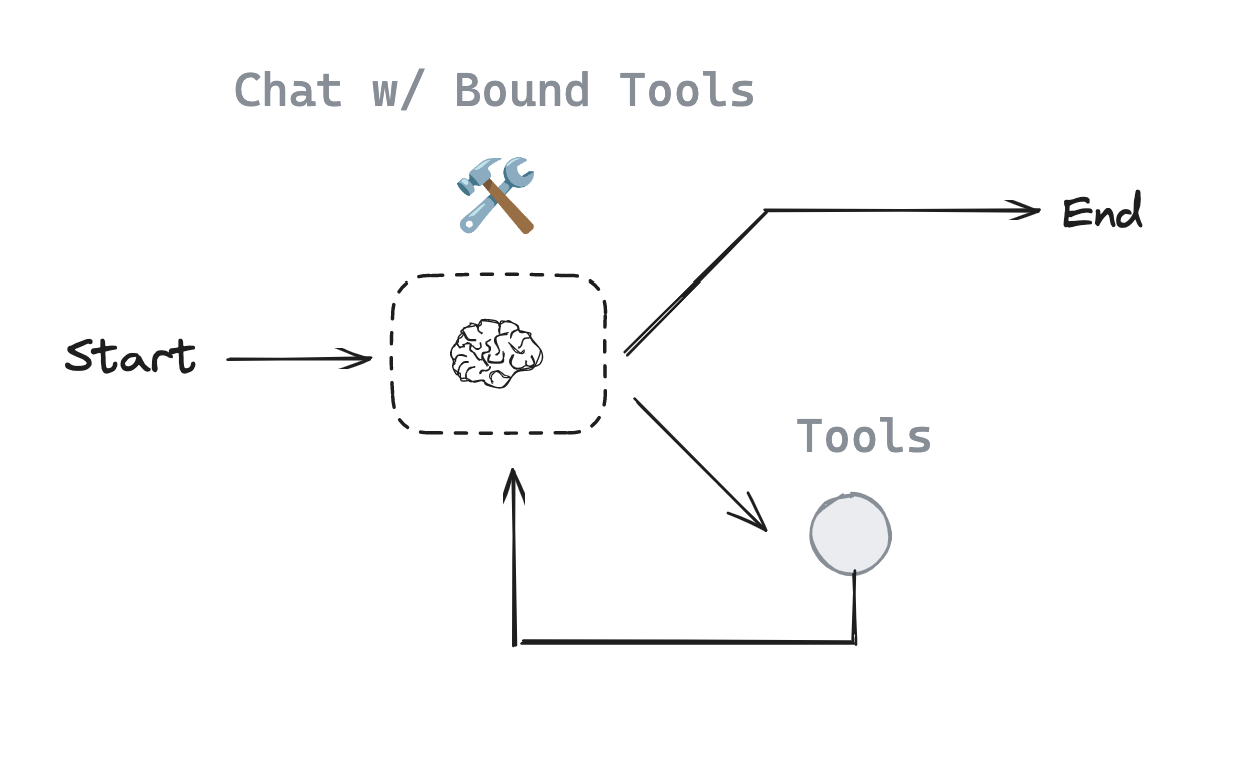
Previously, we built an agent that can:
act- let the model call specific toolsobserve- pass the tool output back to the modelreason- let the model reason about the tool output to decide what to do next (e.g., call another tool or just respond directly)
Goals
Now, we're going extend our agent by introducing memory.
from dotenv import load_dotenv
load_dotenv()
%%capture --no-stderr
%pip install --quiet -U langchain-deepseek langchain_core langgraph langgraph-prebuilt
import os
os.environ["LANGSMITH_TRACING"] = "true"
os.environ["LANGSMITH_PROJECT"] = "langchain-academy"
This follows what we did previously.
from langchain_deepseek import ChatDeepSeek

def multiply(a: int, b: int) -> int:
    """Multiply a and b.

    Args:
        a: first int
        b: second int
    """
    return a * b

# This will be a tool
def add(a: int, b: int) -> int:
    """Adds a and b.

    Args:
        a: first int
        b: second int
    """
    return a + b

def divide(a: int, b: int) -> float:
    """Divide a and b.

    Args:
        a: first int
        b: second int
    """
    return a / b

tools = [add, multiply, divide]
llm = ChatDeepSeek(model="deepseek-v4-pro")
llm_with_tools = llm.bind_tools(tools)
from langgraph.graph import MessagesState
from langchain_core.messages import HumanMessage, SystemMessage

# System message
sys_msg = SystemMessage(content="You are a helpful assistant tasked with performing arithmetic on a set of inputs.")

# Node
def assistant(state: MessagesState):
   return {"messages": [llm_with_tools.invoke([sys_msg] + state["messages"])]}
from langgraph.graph import START, StateGraph
from langgraph.prebuilt import tools_condition, ToolNode
from IPython.display import Image, display

# Graph
builder = StateGraph(MessagesState)

# Define nodes: these do the work
builder.add_node("assistant", assistant)
builder.add_node("tools", ToolNode(tools))

# Define edges: these determine how the control flow moves
builder.add_edge(START, "assistant")
builder.add_conditional_edges(
    "assistant",
    # If the latest message (result) from assistant is a tool call -> tools_condition routes to tools
    # If the latest message (result) from assistant is a not a tool call -> tools_condition routes to END
    tools_condition,
)
builder.add_edge("tools", "assistant")
react_graph = builder.compile()

# Show
display(Image(react_graph.get_graph(xray=True).draw_mermaid_png()))

Memory
Let's run our agent, as before.
messages = [HumanMessage(content="Add 3 and 4.")]
messages = react_graph.invoke({"messages": messages})
for m in messages['messages']:
    m.pretty_print()
================================ Human Message =================================

Add 3 and 4.
================================== Ai Message ==================================
Tool Calls:
  add (call_zZ4JPASfUinchT8wOqg9hCZO)
 Call ID: call_zZ4JPASfUinchT8wOqg9hCZO
  Args:
    a: 3
    b: 4
================================= Tool Message =================================
Name: add

7
================================== Ai Message ==================================

The sum of 3 and 4 is 7.
Now, let's multiply by 2!
messages = [HumanMessage(content="Multiply that by 2.")]
messages = react_graph.invoke({"messages": messages})
for m in messages['messages']:
    m.pretty_print()
================================ Human Message =================================

Multiply that by 2.
================================== Ai Message ==================================
Tool Calls:
  multiply (call_prnkuG7OYQtbrtVQmH2d3Nl7)
 Call ID: call_prnkuG7OYQtbrtVQmH2d3Nl7
  Args:
    a: 2
    b: 2
================================= Tool Message =================================
Name: multiply

4
================================== Ai Message ==================================

The result of multiplying 2 by 2 is 4.
We don't retain memory of 7 from our initial chat!
This is because state is transient to a single graph execution.
Of course, this limits our ability to have multi-turn conversations with interruptions.
We can use persistence to address this!
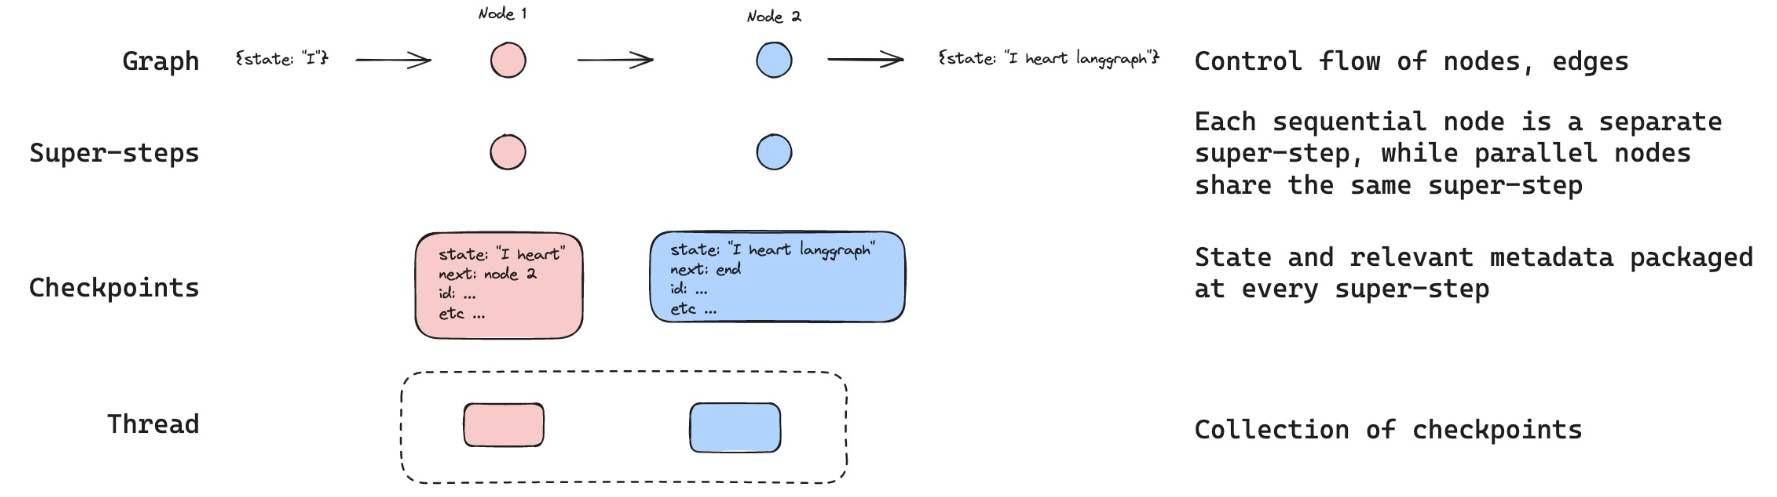
LangGraph can use a checkpointer to automatically save the graph state after each step.
This built-in persistence layer gives us memory, allowing LangGraph to pick up from the last state update.
One of the easiest checkpointers to use is the MemorySaver, an in-memory key-value store for Graph state.
All we need to do is simply compile the graph with a checkpointer, and our graph has memory!
from langgraph.checkpoint.memory import MemorySaver
memory = MemorySaver()
react_graph_memory = builder.compile(checkpointer=memory)
When we use memory, we need to specify a thread_id.
This thread_id will store our collection of graph states.
Here is a cartoon:
- The checkpointer write the state at every step of the graph
- These checkpoints are saved in a thread
- We can access that thread in the future using the
thread_id
# Specify a thread
config = {"configurable": {"thread_id": "1"}}

# Specify an input
messages = [HumanMessage(content="Add 3 and 4.")]

# Run
messages = react_graph_memory.invoke({"messages": messages},config)
for m in messages['messages']:
    m.pretty_print()
================================ Human Message =================================

Add 3 and 4.
================================== Ai Message ==================================
Tool Calls:
  add (call_MSupVAgej4PShIZs7NXOE6En)
 Call ID: call_MSupVAgej4PShIZs7NXOE6En
  Args:
    a: 3
    b: 4
================================= Tool Message =================================
Name: add

7
================================== Ai Message ==================================

The sum of 3 and 4 is 7.
If we pass the same thread_id, then we can proceed from from the previously logged state checkpoint!
In this case, the above conversation is captured in the thread.
The HumanMessage we pass ("Multiply that by 2.") is appended to the above conversation.
So, the model now know that that refers to the The sum of 3 and 4 is 7..
messages = [HumanMessage(content="Multiply that by 2.")]
messages = react_graph_memory.invoke({"messages": messages}, config)
for m in messages['messages']:
    m.pretty_print()
================================ Human Message =================================

Add 3 and 4.
================================== Ai Message ==================================
Tool Calls:
  add (call_MSupVAgej4PShIZs7NXOE6En)
 Call ID: call_MSupVAgej4PShIZs7NXOE6En
  Args:
    a: 3
    b: 4
================================= Tool Message =================================
Name: add

7
================================== Ai Message ==================================

The sum of 3 and 4 is 7.
================================ Human Message =================================

Multiply that by 2.
================================== Ai Message ==================================
Tool Calls:
  multiply (call_fWN7lnSZZm82tAg7RGeuWusO)
 Call ID: call_fWN7lnSZZm82tAg7RGeuWusO
  Args:
    a: 7
    b: 2
================================= Tool Message =================================
Name: multiply

14
================================== Ai Message ==================================

The result of multiplying 7 by 2 is 14.
Studio
⚠️ Notice
Since filming these videos, we've updated Studio so that it can now be run locally and accessed through your browser. This is the preferred way to run Studio instead of using the Desktop App shown in the video. It is now called LangSmith Studio instead of LangGraph Studio. Detailed setup instructions are available in the "Getting Setup" guide at the start of the course. You can find a description of Studio here, and specific details for local deployment here.
To start the local development server, run the following command in your terminal in the /studio directory in this module:
langgraph dev
You should see the following output:
- 🚀 API: http://127.0.0.1:2024
- 🎨 Studio UI: https://smith.langchain.com/studio/?baseUrl=http://127.0.0.1:2024
- 📚 API Docs: http://127.0.0.1:2024/docs
Open your browser and navigate to the Studio UI URL shown above.
Load the agent in Studio, which uses module-1/studio/agent.py set in module-1/studio/langgraph.json.