

Deployment
Review
We built up to an agent with memory:
act- let the model call specific toolsobserve- pass the tool output back to the modelreason- let the model reason about the tool output to decide what to do next (e.g., call another tool or just respond directly)persist state- use an in memory checkpointer to support long-running conversations with interruptions
Goals
Now, we'll cover how to actually deploy our agent locally to Studio and to LangGraph Cloud.
from dotenv import load_dotenv
load_dotenv()
%%capture --no-stderr
%pip install --quiet -U langgraph_sdk langchain_core
Concepts
There are a few central concepts to understand -
LangGraph —
- Python and JavaScript library
- Allows creation of agent workflows
LangGraph API —
- Bundles the graph code
- Provides a task queue for managing asynchronous operations
- Offers persistence for maintaining state across interactions
LangSmith Deployment (formerly LangGraph Cloud) --
- Hosted service for the LangGraph API
- Allows deployment of graphs from GitHub repositories
- Also provides monitoring and tracing for deployed graphs
- Accessible via a unique URL for each deployment
LangSmith Studio (formerly LangGraph Studio) --
- Integrated Development Environment (IDE) for LangGraph applications
- Uses the API as its back-end, allowing real-time testing and exploration of graphs
- Can be run locally or with cloud-deployment. See below.
LangGraph SDK --
- Python library for programmatically interacting with LangGraph graphs
- Provides a consistent interface for working with graphs, whether served locally or in the cloud
- Allows creation of clients, access to assistants, thread management, and execution of runs
Testing Locally
Studio
⚠️ Notice
Since filming these videos, we've updated Studio so that it can now be run locally and accessed through your browser. This is the preferred way to run Studio instead of using the Desktop App shown in the video. It is now called LangSmith Studio instead of LangGraph Studio. Detailed setup instructions are available in the "Getting Setup" guide at the start of the course. You can find a description of Studio here, and specific details for local deployment here.
To start the local development server, run the following command in your terminal in the /studio directory in this module:
langgraph dev
You should see the following output:
- 🚀 API: http://127.0.0.1:2024
- 🎨 Studio UI: https://smith.langchain.com/studio/?baseUrl=http://127.0.0.1:2024
- 📚 API Docs: http://127.0.0.1:2024/docs
Open your browser and navigate to the Studio UI URL shown above.
if 'google.colab' in str(get_ipython()):
    raise Exception("Unfortunately LangGraph Studio is currently not supported on Google Colab")
from langgraph_sdk import get_client
# This is the URL of the local development server
URL = "http://127.0.0.1:2024"
client = get_client(url=URL)

# Search all hosted graphs
assistants = await client.assistants.search()
assistants[-3]
{'assistant_id': 'fe096781-5601-53d2-b2f6-0d3403f7e9ca',
 'graph_id': 'agent',
 'config': {},
 'metadata': {'created_by': 'system'},
 'name': 'agent',
 'created_at': '2025-03-04T22:57:28.424565+00:00',
 'updated_at': '2025-03-04T22:57:28.424565+00:00',
 'version': 1}
# We create a thread for tracking the state of our run
thread = await client.threads.create()
Now, we can run our agent with client.runs.stream with:
- The
thread_id - The
graph_id - The
input - The
stream_mode
We'll discuss streaming in depth in a future module.
For now, just recognize that we are streaming the full value of the state after each step of the graph with stream_mode="values".
The state is captured in the chunk.data.
from langchain_core.messages import HumanMessage

# Input
input = {"messages": [HumanMessage(content="Multiply 3 by 2.")]}

# Stream
async for chunk in client.runs.stream(
        thread['thread_id'],
        "agent",
        input=input,
        stream_mode="values",
    ):
    if chunk.data and chunk.event != "metadata":
        print(chunk.data['messages'][-1])
Testing with Cloud
We can deploy to Cloud via LangSmith, as outlined here.
Create a New Repository on GitHub
- Go to your GitHub account
- Click on the "+" icon in the upper-right corner and select
"New repository" - Name your repository (e.g.,
langchain-academy)
Add Your GitHub Repository as a Remote
- Go back to your terminal where you cloned
langchain-academyat the start of this course - Add your newly created GitHub repository as a remote
git remote add origin https://github.com/your-username/your-repo-name.git
- Push to it
git push -u origin main
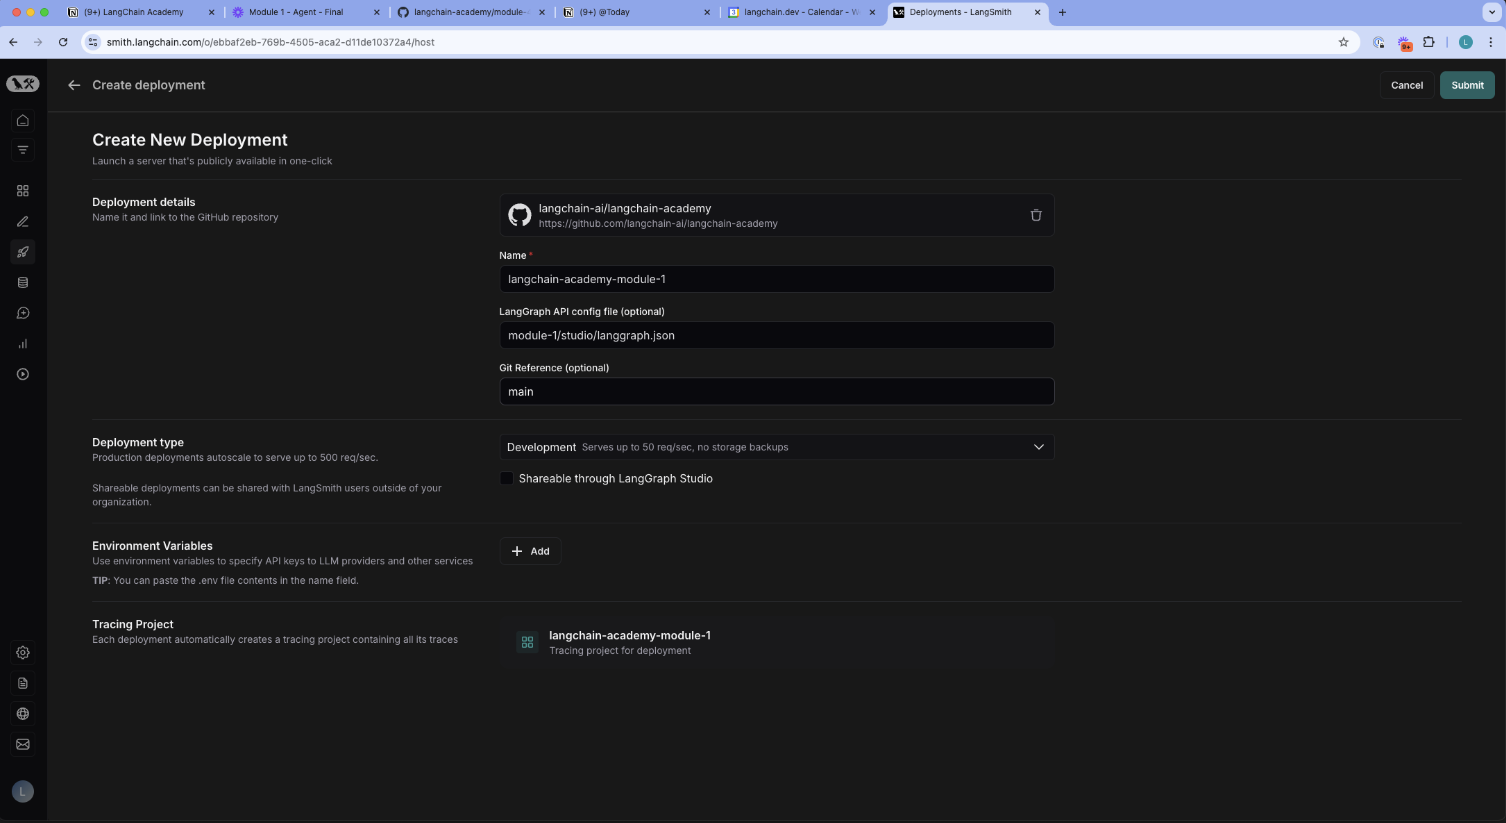
Connect LangSmith to your GitHub Repository
- Go to LangSmith
- Click on
deploymentstab on the left LangSmith panel - Add
+ New Deployment - Then, select the Github repository (e.g.,
langchain-academy) that you just created for the course - Point the
LangGraph API config fileat one of thestudiodirectories - For example, for module-1 use:
module-1/studio/langgraph.json - Set your API keys (e.g., you can just copy from your
module-1/studio/.envfile)
Work with your deployment
We can then interact with our deployment a few different ways:
- With the SDK, as before.
- With LangGraph Studio.
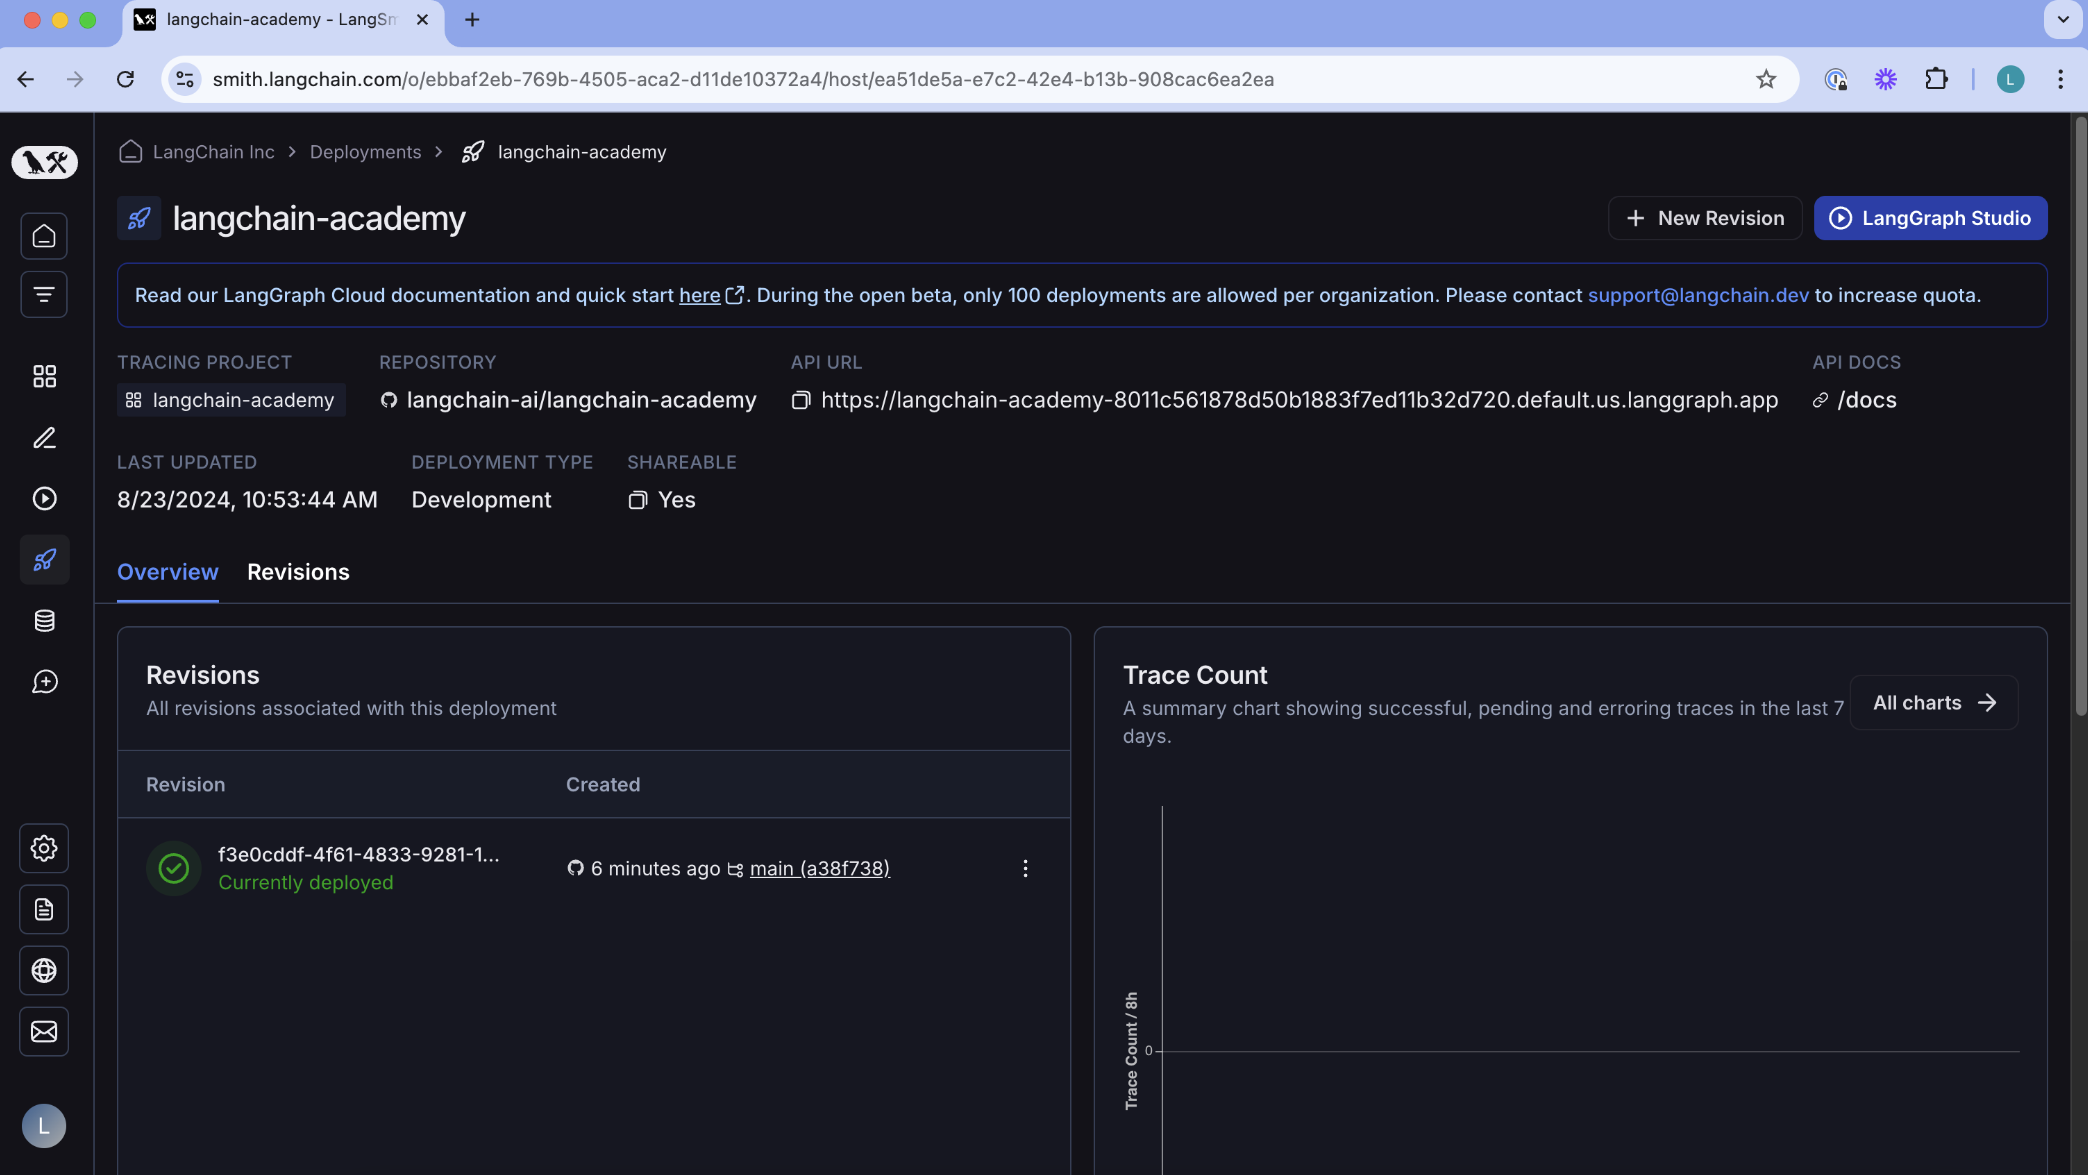
To use the SDK here in the notebook, simply ensure that LANGSMITH_API_KEY is set!
# Replace this with the URL of your deployed graph
URL = "https://langchain-academy-8011c561878d50b1883f7ed11b32d720.default.us.langgraph.app"
client = get_client(url=URL)

# Search all hosted graphs
assistants = await client.assistants.search()
# Select the agent
agent = assistants[0]
agent
{'assistant_id': 'fe096781-5601-53d2-b2f6-0d3403f7e9ca',
 'graph_id': 'agent',
 'created_at': '2024-08-23T17:58:02.722920+00:00',
 'updated_at': '2024-08-23T17:58:02.722920+00:00',
 'config': {},
 'metadata': {'created_by': 'system'}}
from langchain_core.messages import HumanMessage

# We create a thread for tracking the state of our run
thread = await client.threads.create()

# Input
input = {"messages": [HumanMessage(content="Multiply 3 by 2.")]}

# Stream
async for chunk in client.runs.stream(
        thread['thread_id'],
        "agent",
        input=input,
        stream_mode="values",
    ):
    if chunk.data and chunk.event != "metadata":
        print(chunk.data['messages'][-1])